


I hope you enjoy the pattern!
 |
| Snowman Hat |
Snowman earflap hat
Child size
What you will need:
I hook
G hook
Worsted weight yarn. I used White, black, and orange.
Scissors
Yarn needle
Round 1: Make Magic circle, ch 2, 10 dc in circle. Join in first dc. (10 dc)
Round 2: ch 2 2 dc in each st around. Join in first dc. (20 dc)
Round 3: ch 2 *2 dc in first st, 1 dc in next st* repeat around. Join in first dc. (30 dc)
Round 4: ch 2 *2 dc in first st, 1 dc in next 2 st’s* repeat around. Join in first dc. (40 dc)
Round 5: ch 2 *2 dc in first st, 1 dc in next 3 st’s* repeat around. Join in first dc. (50 dc)
Round 6-13: ch 2, dc in each st around. Join in first dc. (50 dc)
Do not fasten off.
Right Earflap.
Row 1: ch 1 hdc in next 10 st.
Row 2: ch 1, turn, hdc2tog , sc in next 6 st‘s, sc2tog. (8 sc)
Row 3: ch 1, turn, hdc in each st across. (8 sc)
Row 4: ch 1, turn, hdc2tog, sc in next 4 st’s, sc2tog. (6 sc)
Row 5: ch 1, turn, hdc in each st across. (6 sc)
Row 6: ch 1, turn, hdc2tog, sc in next 2 st’s, sc2tog. (4 sc)
Row 7: ch 1, turn, hdc in each st across. (4 sc)
Row 8: ch 1, turn, hdc2tog twice. (2 sc)
Fasten off
Left Earflap
Count 16 st’s to the left. Join yarn in 16th st.
Row 1: ch 1 hdc in next 10 st.
Row 2: ch 1, turn, hdc2tog , sc in next 6 st‘s, sc2tog. (8 sc)
Row 3: ch 1, turn, hdc in each st across. (8 sc)
Row 4: ch 1, turn, hdc2tog, sc in next 4 st’s, sc2tog. (6 sc)
Row 5: ch 1, turn, hdc in each st across. (6 sc)
Row 6: ch 1, turn, hdc2tog, sc in next 2 st’s, sc2tog. (4 sc)
Row 7: ch 1, turn, hdc in each st across. (4 sc)
Row 8: ch 1, turn, hdc2tog twice. (2 sc)
Do not fasten off.
Ch 1, hdc in each st around, 2 hdc in each of the 2 st at the bottom of the earflaps.
Nose
Using G hook and orange yarn.
Do not join rounds!
Magic ring, 6 sc into ring, pull ring closed tight
2 sc in each st around (12 sc)
1 sc in each st around (12 sc)
1 sc in each st around (12 sc)
1 sc in each st around (12 sc)
*1 sc in next st, 2 sc in next st* repeat around (18 sc)
1 sc in each st around (18 sc)
Skip next st and join in next st.
Fasten off leaving long tail for sewing
Eyes and Mouth (make 7)
Using g hook and black yarn.
Ch 2, 12 dc in first ch. Join in first dc. Fasten off leaving long tail for sewing.
Braids
Cut 12 strands of yarn twice as long as you want your braids to be. (6 strands for each earflap) (cut more strands if you want thicker braids)
*Double 6 of the strands in half and attach to the bottom of each earflap.
Divide the strands into thirds and braid down the length of your yarn. Tie a knot in the bottom of the braid to secure it.*
Repeat for second earflap.
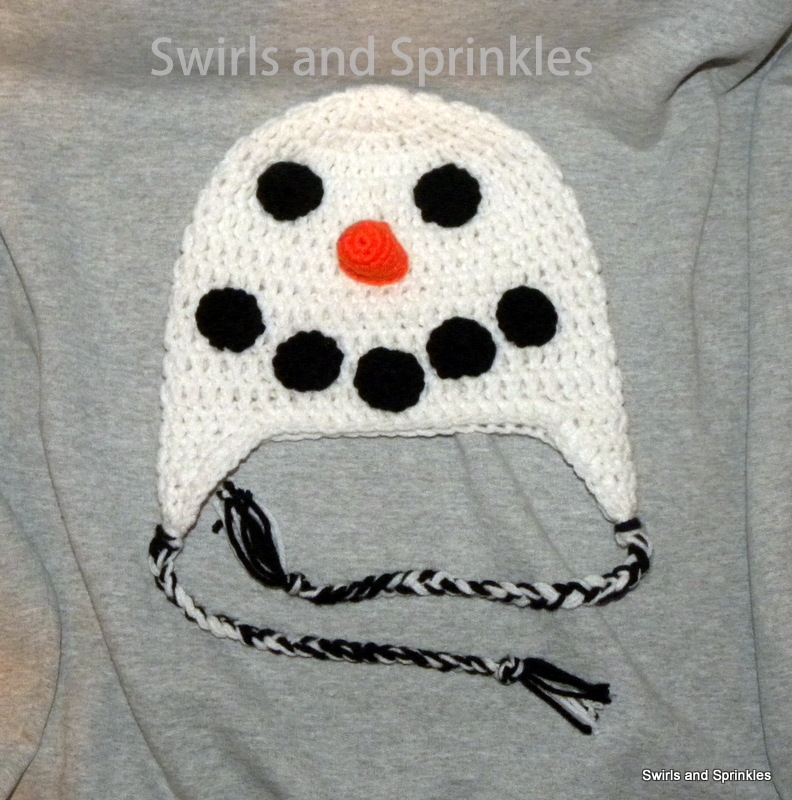
Sew eyes, nose, and mouth pieces on using the photo for reference. I suggest you attach your nose and eyes a row or two lower than I did in the photos.
I sew the middle mouth piece on first. That helps to line everything else up.
 |
| Snowman Hat |


What is the magic circle? I would love to make this hat.
ReplyDeleteThank you for asking! I have had that question a few times now, so I decided to do a post about it. I have also added a new tab to the blog. "Resources and Tutorials".
DeleteHere is a link to the magic circle post. (if the link does not work, you can copy and paste the link into your browser)
I hope you find it helpful!
http://swirlsandsprinklesblog.blogspot.com/2012/12/what-is-magic-circle.html
how do I print out the patterns I like to my printer?
ReplyDeleteSelect what you want to print then drop down menu File> Print> click Selection and print <3
ReplyDeleteLOL this makes me giggle, But a good giggle :) LOVE it...
ReplyDeleteI did a print preview and it shows all the things in blue on each side over the pattern. So much so, I don't think I can read it.
ReplyDeleteSorry about the difficulty with printing. I will look into a "clean print" option to add onto the site. Thank you for letting me know!
Delete