 |
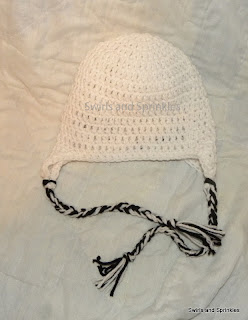
| Earflap hat |
Earflap Hat
Child size
I hook
Ww yarn
Round 1: ch2 Magic circle, 10 dc in circle. Join in first dc. (10 dc)
Round 2: ch 2 2 dc in each st around. Join in first dc. (20 dc)
Round 3: ch 2 *2 dc in first st, 1 dc in next st* repeat around. Join in first dc. (30 dc)
Round 4: ch 2 *2 dc in first st, 1 dc in next 2 st’s* repeat around. Join in first dc. (40 dc)
Round 5: ch 2 *2 dc in first st, 1 dc in next 3 st’s* repeat around. Join in first dc. (50 dc)
Round 6-13: ch 2, dc in each st around. Join in first dc. (50 dc)
Do not fasten off.
Right Earflap.
Row 1: ch 1 hdc in next 10 st.
Row 2: ch 1, turn, hdc2tog , sc in next 6 st‘s, sc2tog. (8 sc)
Row 3: ch 1, turn, hdc in each st across. (8 sc)
Row 4: ch 1, turn, hdc2tog, sc in next 4 st’s, sc2tog. (6 sc)
Row 5: ch 1, turn, hdc in each st across. (6 sc)
Row 6: ch 1, turn, hdc2tog, sc in next 2 st’s, sc2tog. (4 sc)
Row 7: ch 1, turn, hdc in each st across. (4 sc)
Row 8: ch 1, turn, hdc2tog twice. (2 sc)
Fasten off
Left Earflap
Count 16 st’s to the left. Join yarn in 16th st.
Row 1: ch 1 hdc in next 10 st.
Row 2: ch 1, turn, hdc2tog , sc in next 6 st‘s, sc2tog. (8 sc)
Row 3: ch 1, turn, hdc in each st across. (8 sc)
Row 4: ch 1, turn, hdc2tog, sc in next 4 st’s, sc2tog. (6 sc)
Row 5: ch 1, turn, hdc in each st across. (6 sc)
Row 6: ch 1, turn, hdc2tog, sc in next 2 st’s, sc2tog. (4 sc)
Row 7: ch 1, turn, hdc in each st across. (4 sc)
Row 8: ch 1, turn, hdc2tog twice. (2 sc)
Do not fasten off.
Ch 1, hdc in each st around, 2 hdc in each of the 2 st at the bottom of the earflaps.
Braids
Cut 12 strands of yarn twice as long as you want your braids to be. (6 strands for each earflap) (cut more strands if you want thicker braids)
*Fold 6 of the strands in half and attach to the bottom of each earflap.
Divide the strands into thirds and braid down the length of your yarn. Tie a knot in the bottom of the braid to secure it.*
Repeat for second braid.
I just want to say thank you for this tutorial, it has created the cutest hat ever
ReplyDeleteThank you
Thank you for the pattern :)
ReplyDeleteFIRST AND SECOND TIME I MADE THE HAT I USED WHAT YOU SAID, AN I CROCHET HOOK. NEEDLESS TO SAY, THE HAT FITS AN ADULT. SO I USED A SMALLER HOOK AND FINALLY GOT AN INFANT SIZE HAT. BUT THANKS FOR THE PATTERN.
ReplyDeleteHELEN FROM TOMS RIVER NJ
I'm sorry you had trouble with the pattern as written. I wrote it as a child size which is typically 3-10. (admittedly most child size hats actually fit me)
DeleteThe tension use can affect the final size as well.
I am very glad you were able to find the right size hook for the size you needed!
I have a question...when crocheting in the round, is the side facing you or the side facing away from you the "right" side of the finished project??? Thank you!
ReplyDeleteGreat question! When crocheting in the round, the side facing you is the right side.
DeleteHappy crocheting!
Is this US stiches or UK? Thanks
ReplyDeleteAll of my patterns are in US stitches. :)
DeleteCute pattern! Thanks for sharing! I'm making hats for a local cancer center and I started with your pattern! Thanks again ❤️
ReplyDelete